Sunday, September 19, 2010

Fruitful Garden

I was invited by a colleague to visit his house in the countryside this weekend. He's been bringing apples, walnuts, plums etc. to work whenever it's harvesting season, of course I'm curious to see what kind of garden he has and was definitely thrilled to be invited. An hour and a half train ride brings me to his lovely house in the flat green behind a local community owned pond.

Bee in flower, love this picture
Driving down a small road filled with beach stone, a small delicate yellow brick house with white window panes sits quietly between the pond and a large horse field. We had some lunch together, actually long lunch, plenty to chat from 12:30 until 15:00, then a garden tour starts.

The garden is categorized into sections based on its used. Vegetables (potatoes, carrots, cabbages, lettuces, onions, green peas, corns) and strawberries are planted in two big sections side by side, surrounded by beautiful flowers (and huge sunflowers); tall trees (walnut, pine, 'Christmas tree' and some huge evergreen trees) are intentionally planted at the outer most ring of the garden to provide natural fence towards the horse field and also the neighbours. 

Some of the beautiful flowers in garden
A hazel tree is planted next to these vegetable areas along side with one of the walnut tree. I have always known hazelnut as the way they are available in the supermarket (only the nut) and was totally amazed with how it looks like when it's still enclosed, hanging from the tree. On top of these plants, apple trees, pear trees, plum trees (he has 3 different types of apple & plum tree each) and cherry tree are scattered around the garden as well as some black & red current trees with strings of fruit.

From top left (clockwise): pink apple, pink pear, hazelnut (in  husk), walnut (encapsulated in green outer shell) and wild berry in the centre


A 10mx10m green house with cherry tomato, cucumber, red & green jalapeno, grapes and bigger tomatoes situated beside a small pond with lotus and some fishes and even a small bridge across the pond (my colleague dug a hole to create the pond) with a few benches placed strategically around the pond, simply beautiful. Some bamboos are plant on one side of the pond. I could sit for hours in this picturesque setting if the weather is nice.

Vegetables in the garden
We continued out to the community owned pond (where my colleague actually takes care of) and discover some frogs, duck, trace of fishes and wild mushrooms. I have absolutely no courage or intention to try them but they look stunning in the pictures. There are also some red leave plants in his front garden, so there's definitely something to see every season :)

Poisonous looking black mushroom

More wild mushroom, love the orange colour
Aside from the flora, fauna activities are not lacking in this garden. Three large chicken (that loves peanut) lives in a fenced area, plenty of room to roam around. A small water container with squirrel statue strategically placed outside the dining room window to enable birds watching when they come for drink or take a dip into the water or even eating from one of the many bird feeders placed around the garden.
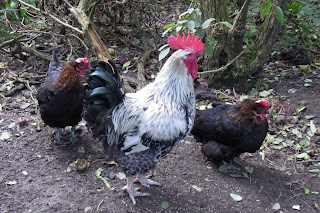
The happy chicken family, what happen to 1 wife policy?
Snails, snails, spider & ladybirds.
More insects are found during my visit: different types of snails, many different types of spiders, bees, ladybirds, birds, fish, frog, lizards...the garden is definitely lively. At last, the garden tour ended after 1hr50mins, I didn't even notice the time slipped away so fast, explains how huge the garden is ;). As a guest, I  was given the privilege to pick something (anything) from the garden so here's what I got:-


That concludes my wonderful, eye opening and fruitful visit (and the best cherry tomato that I've ever tasted). If I have a garden (and a gardener), I'd love to have a garden like this. To the least, the pond is a must have, too lovely to let go in any garden planning ;)

Wednesday, September 15, 2010

Tale of a Chilli

One of my project manager (yes, we have a lot of managers at work :p), despite a Dane, he actually worked and stayed in Singapore for 9 years before he came back to Denmark recently. Being so long in a hot & humid tropical country that loves chilli, he too, has been influenced to live with chilli in his life. Instead of buying chilli that is commonly available in ordinary supermarket (and they can be spicy too), he grow his own chilli at home.

One of these days, he was bragging about the spiciness of his home grown chilli and I gave my usual sceptical review on his comment. The next day, I found a chilli, carefully wrapped in kitchen towel, lying quietly on my laptop at work. In order to 'savour' his hard work (in growing the chilli) and effort (for bringing it), I decided to use it in my favourite vegetable dish - kangkung belachan (shrimp paste stir fried water convovulus).

Belacan kangkung
A trip to the Asian shop to get water convuvulus (kangkung / eng chai in hokkien), a few raw tiger prawns, a crab filament stick (that's all I have in the freezer), minced garlic, chicken stock, chopped dried shrimp, belacan plus the 'star' (because it's a gift) ingredient - Kim's home grown chilli, and I'm all set for some wok action.
Ingredient (minus vegetable =.=)
Heat wok on high heat with 1-2 tablespoon of oil until it starts to smoke, do not reduce the heat throughout the whole cooking process to maintain 'wok hei (锅气)'. Add in belacan and stir fried till fragrant, then add in the dried shrimp and chilli, for a few round of quick stir (about 30 seconds). Dried shrimp might get burn at high heat so stir frequently. Then add in minced garlic, stir fried until fragrant, add shrimp and crab filament.
Processed ingredient
Before the prawn is fully cook, add the vegetable. Stir fried until the vegetable's colour turn darker (indicating it's cooked), add in chicken stock (to taste). Water convovolus will release some water during the cooking process but if you like more sauce, then add a few tablespoon of water. Quick stir for another 30 seconds and voila...a plate of spicy steaming full of fragrant kangkung belacan is ready to be served.

Saturday, September 11, 2010

Hjælp, Jeg er i Japan!

Danish paid TV (TV3 Viasat) is showing an 'intriguing' show - Help, I am in Japan (Hjælp, Jeg er i Japan in Danish) where 10 Danes are selected to live in Tokyo, participate in crazy contests of Japanese game show in TV studio and faced a number of cultural challenges in their everyday life while staying in Japan. The winner will walk away with 250,000DKK.

The ten participants in the program live together in a house where there's a housekeeper - an English speaking Japanese housewife helps with some basic chores. First day when they enter the house, they walked right in with shoes on, even into their own bedroom without realizing how rude this is in Japanese culture (the camera focused on the shoes, haha).


The contestants are also subjected to addition of challenges in Tokyo's street grocery shopping on first episode. They were paired up two by two and one of the team was asked to buy garlic. In Japanese pronunciation, garlic & condom are rather similar. They went around screaming after condom on the street, being corrected several times by locals on their pronunciation but they just wet totally wrong and ended up buying condom home for cooking :s


In the TV studio is where the 'cruelty' is: the elimination of one participants each week. The show is conducted in Japanese with Japanese host & audiences. When the contestants were asked questions, the host will change to English (or rather 'Japlish'), and so we have confused contestants participating in weird funny game shows; whilst the Danes find the exaggerating expression / body language of the hosts funny instead.


Albeit entertaining to see the show (and to wonder at the ignorance of some participating Dane on cultural & tradition difference), one can't help but to ponder: have I been doing the similar respect-less behaviour action sometime somewhere?

Here's a link if you're interested (and understands Danish :)  http://tv3.dk/japan/

Sunday, September 5, 2010

Momofuku Fried Chicken

I've seen so many great comments / reviews about Momofuku (not the Ramen creator, but David Chang's restaurants) and have been longing to try its dish. Nevertheless, New York is not exactly near from Copenhagen and albeit in plan, I didn't manage to put down an actual plan to visit the city yet. Dying to try the dish, I looked up some Momofuku dishes and find the most executable one to try out.
Momofuku fried chicken
Why executable? None of Momofuku's recipe requires less than half a day preparation, some even requires a few days of preparation, I'm so defeated just by reading the recipe. Normally if I fried chicken, I'll just marinate the chicken overnight & throw it into my deep fryer but the Momofuku fried chicken recipe seems achievable with stunning result, hence my first Momofuku attempt.

I used 6 chicken drumsticks, brine them in water, sugar & salt liquid in container for 2hours in fridge, then steam them for about 40minutes until cooked. The cooked drumsticks are then chilled in fridge overnight on rack (or at least 2 hours) to make sure the skin is dried. The chicken is taken out from fridge at least 30 minutes before frying (to bring it to room temperature) and then fried in a deep fryer of 185ºC, turning once until the skin is deep brown and crisp (about 6 - 8 minutes).
Brined, steamed chicken drumstick on a rack
I have pre-made some octo vinaigrette sauce made of finely chopped garlic, ginger, sugar, bird's eye chilli, rice wine vinegar, sesame oil, cooking oil and soy sauce; which is said to taste good with everything (proven) except ostrich egg by David Chang. The fried drumsticks taste good on its own, crispy skin, oh...I can eat a lot of those; tossing them in octo vinaigrette brings the drumstick to another level, it's heavenly. Finger tripple licking good.

Octo vinaigrette sauce

My verdict: although the recipe is time consuming but the result is well worth the effort. Mr.T thinks fried chicken should be done that way!!  :)

In face, the sauce was so good that I refuse to throw the leftovers away. I brine some chicken breast, deep fried them, heat the sauce in a sauce pan and toss in the chicken. Result? Wonderful.
Fried chicken breast in octo vinaigrette sauce

Summer Peach Cake

It's been quite some time since I last baked. My latest creation - chocolate banana cake was baked under the condition of lack of banana, so the filling is too little compare to the rich cake. My colleagues called my chocolate banana cake - chocolate chocolate banana cake, they said that's the only way to correctly reflect my cake.

So, wanted to build up my reputation again, I chosen another layered cake recipe with peach. Even though widely available in summer, I choose the can peach to ensure the sweetness of the peach, also to save some time making the sugar syrup.

The baking is easy but cutting the into halves are not. Initially I plan to make a three layer cake but my first cut nearly broke the cake into pieces, so I have no choice but to stay with 2 layers. The cake looks beautiful with the colour contrasts and it tastes great too, my colleagues love it. Recipe as follow:-


Summer Peach Cake
White Butter Cake:
2 large eggs, separated
1 3/4 cups (175 grams) sifted cake flour
2 teaspoons baking powder
1/4 teaspoon salt
1/2 cup (113 grams) unsalted butter, at room temperature
1 cup (200 grams) granulated white sugar, divided
1 teaspoon pure vanilla extract
1/2 cup (120 ml) milk
1/8 teaspoon cream of tartar
White Butter Cake
1. While eggs are still cold separate the eggs, placing the yolks in one bowl and the whites in another bowl.  Cover the two bowls with plastic wrap and allow the eggs to come to room temperature before using (about 30 minutes). 
2. Preheat oven to 350 degrees F (177 degrees C) and place rack in center of oven. 
3. Butter and flour an - 8 inch (20 cm) round cake pans. Line bottoms of pans with parchment paper and grease and flour parchment paper.
4. In a mixing bowl sift or whisk together the flour, baking powder, and salt.
5. In bowl of electric mixer, beat the butter until soft (about 1-2 minutes). 
6. Add 3/4 cup (150 grams) of the sugar and beat until light and fluffy (about 2-3 minutes). 
7. Add egg yolks, one at a time, beating after each addition. Scrape down the sides of the bowl. 
8. Add the vanilla extract and beat until combined.
9. With the mixer on low speed, alternately add the flour mixture and milk, in three additions, beginning and ending with the flour.  
10. In a clean bowl of electric mixer, with the whisk attachment, beat the egg whites until foamy. 
11. Add the cream of tartar and continue beating until soft peaks form. Gradually add the remaining 1/4 cup (50 grams) of sugar and continue to beat until stiff peaks form. 
12. With a rubber spatula gently fold a little of the whites into the batter to lighten it, and then fold in the remaining whites until combined. Do not over mix the batter or it will deflate.
13. Pour the batter into the prepared pans and smooth the tops with an offset spatula or the back of a spoon. Bake in the preheated oven for approximately 20 - 25 minutes, or until a toothpick inserted in the center of the cake comes out clean.
14. Cool the cakes in their pans on a wire rack for 10 minutes.  Place a wire rack on top of the cake pan and invert, lifting off the pan. 
15. Once the cakes have completely cooled, wrap in plastic and place the cake layers in the freezer for at least an hour. (This is done to make filling and frosting the cakes easier.)

Filling:
250g. mascarpone cheese
40ml heavy cream
2.5 Tablespoons powdered sugar
½ Teaspoon vanilla
3 peaches, thinly sliced (peel 2 before slicing, leave the peal on 1 to use to decorate the top of the cake.
1. Beat cheese, cream, sugar, and vanilla with a mixer until smooth.
2. Cut the cake in half (to make a 4-layer cake. Slice the cake horizontally into 2-3 layers.
3. Place one layer cut-side up on a cake board or serving plate and lightly crush the surface with the simple syrup. 
3. Spread a thin layer of mascarpone filling over the cake layer and arrange the peach slices over the surface.  
4. Spread an additional layer of mascarpone filling over the peaches. 
5. Brush the cut-side of the second layer with the simple syrup and place it over the first layer. Repeat for subsequent layers (if needed).

For the stabilized whipped cream frosting:
1 teaspoon unflavored gelatin
4 teaspoons cold water
240ml  cold heavy whipping cream
1/4 cup confectioners’ sugar
1/2 teaspoon vanilla extract
3 peaches, thinly sliced (peel 2 before slicing, leave the peal on 1 to use to decorate the top of the cake.
1. Put the cold water in a small saucepan.  Sprinkle the gelatin over the surface of the water and let stand for 5 minutes (do not stir).  Dissolve gelatin by microwaving for 1 minute. Remove from microwave and let stand at room temperature for 10 minutes; gelatin must be liquid but not warm when added to cream.
2. In a mixing bowl, combine the whipping cream, sugar, and vanilla and stir to combine. Cover and chill the bowl & wire whisk in the fridge for at least 30 minutes. When chilled, beat the mixture until beater marks are slightly distinct.  Then, while beating slowly, gradually pour the gelatin into the whipped cream mixture.  Then whip the mixture at high speed until stiff peaks form.
3. Frost the sides and top of the cake with the remaining whipped cream.  Decorate as desired and garnish with the reserved strawberries. Decorate top of the cake with skin-on peach slices. Refrigerate for at least 30 minutes (preferable longer) before cutting.